Introduction
Ansible Collections are the standard way to package and distribute Ansible content — modules, roles, plugins, and playbooks — as reusable units. The ansible-creator tool (part of the Ansible Development Tools) scaffolds a complete collection structure with all the required files, saving you from creating the directory tree manually.
This guide covers both the CLI and VS Code GUI approaches to creating collections.
Prerequisites
Install ansible-creator
pip install ansible-creator
Verify installation:
ansible-creator --version
Install VS Code Ansible Extension (Optional)
- Open VS Code
- Go to Extensions (Ctrl+Shift+X)
- Search for "Ansible" by Red Hat
- Click Install
The extension includes ansible-creator integration with a graphical interface.
Method 1: CLI with ansible-creator
Initialize a New Collection
ansible-creator init collection myorg.myapp --init-path ./collections
This creates the full collection structure:
collections/myorg/myapp/
├── CHANGELOG.rst
├── changelogs/
│   └── config.yaml
├── docs/
├── galaxy.yml
├── meta/
│   └── runtime.yml
├── plugins/
│   ├── filter/
│   ├── inventory/
│   ├── lookup/
│   ├── module_utils/
│   └── modules/
├── README.md
├── roles/
├── tests/
│   ├── integration/
│   └── unit/
└── playbooks/
CLI Options
| Option | Description |
|---|---|
--init-path | Directory to create the collection in |
--force | Overwrite existing collection (re-scaffold) |
--verbosity | Output detail level (0-3) |
--log-file | Write output to a log file |
Example with All Options
ansible-creator init collection myorg.network_utils \
  --init-path ~/projects/collections \
  --verbosity 2 \
  --log-file /tmp/collection-init.log
Method 2: VS Code GUI
Step 1: Open the Ansible Creator
- Open VS Code and click the Ansible icon in the Activity Bar
- Click "Get Started" in the Ansible Creator section
- The System Requirements box shows the status of ansible, Python, and ansible-creator
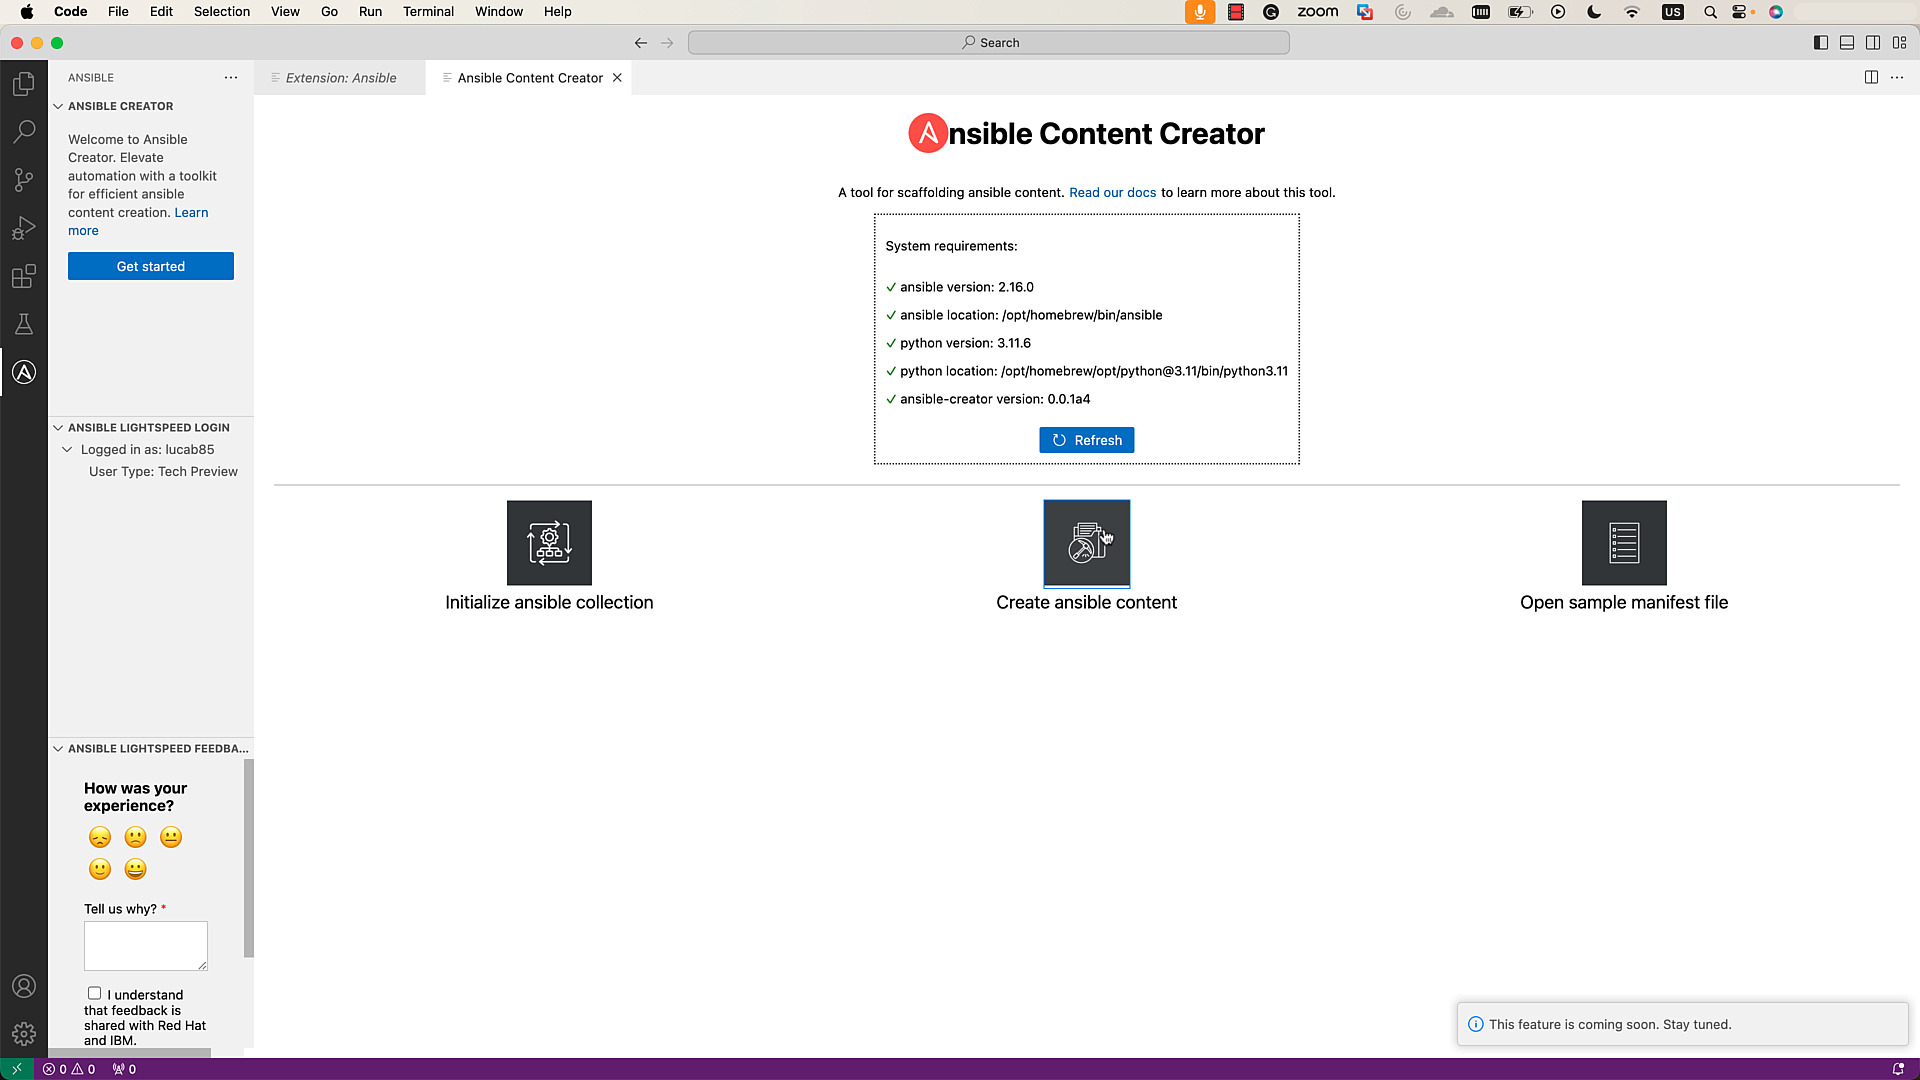
Ensure all requirements display green ticks before proceeding.
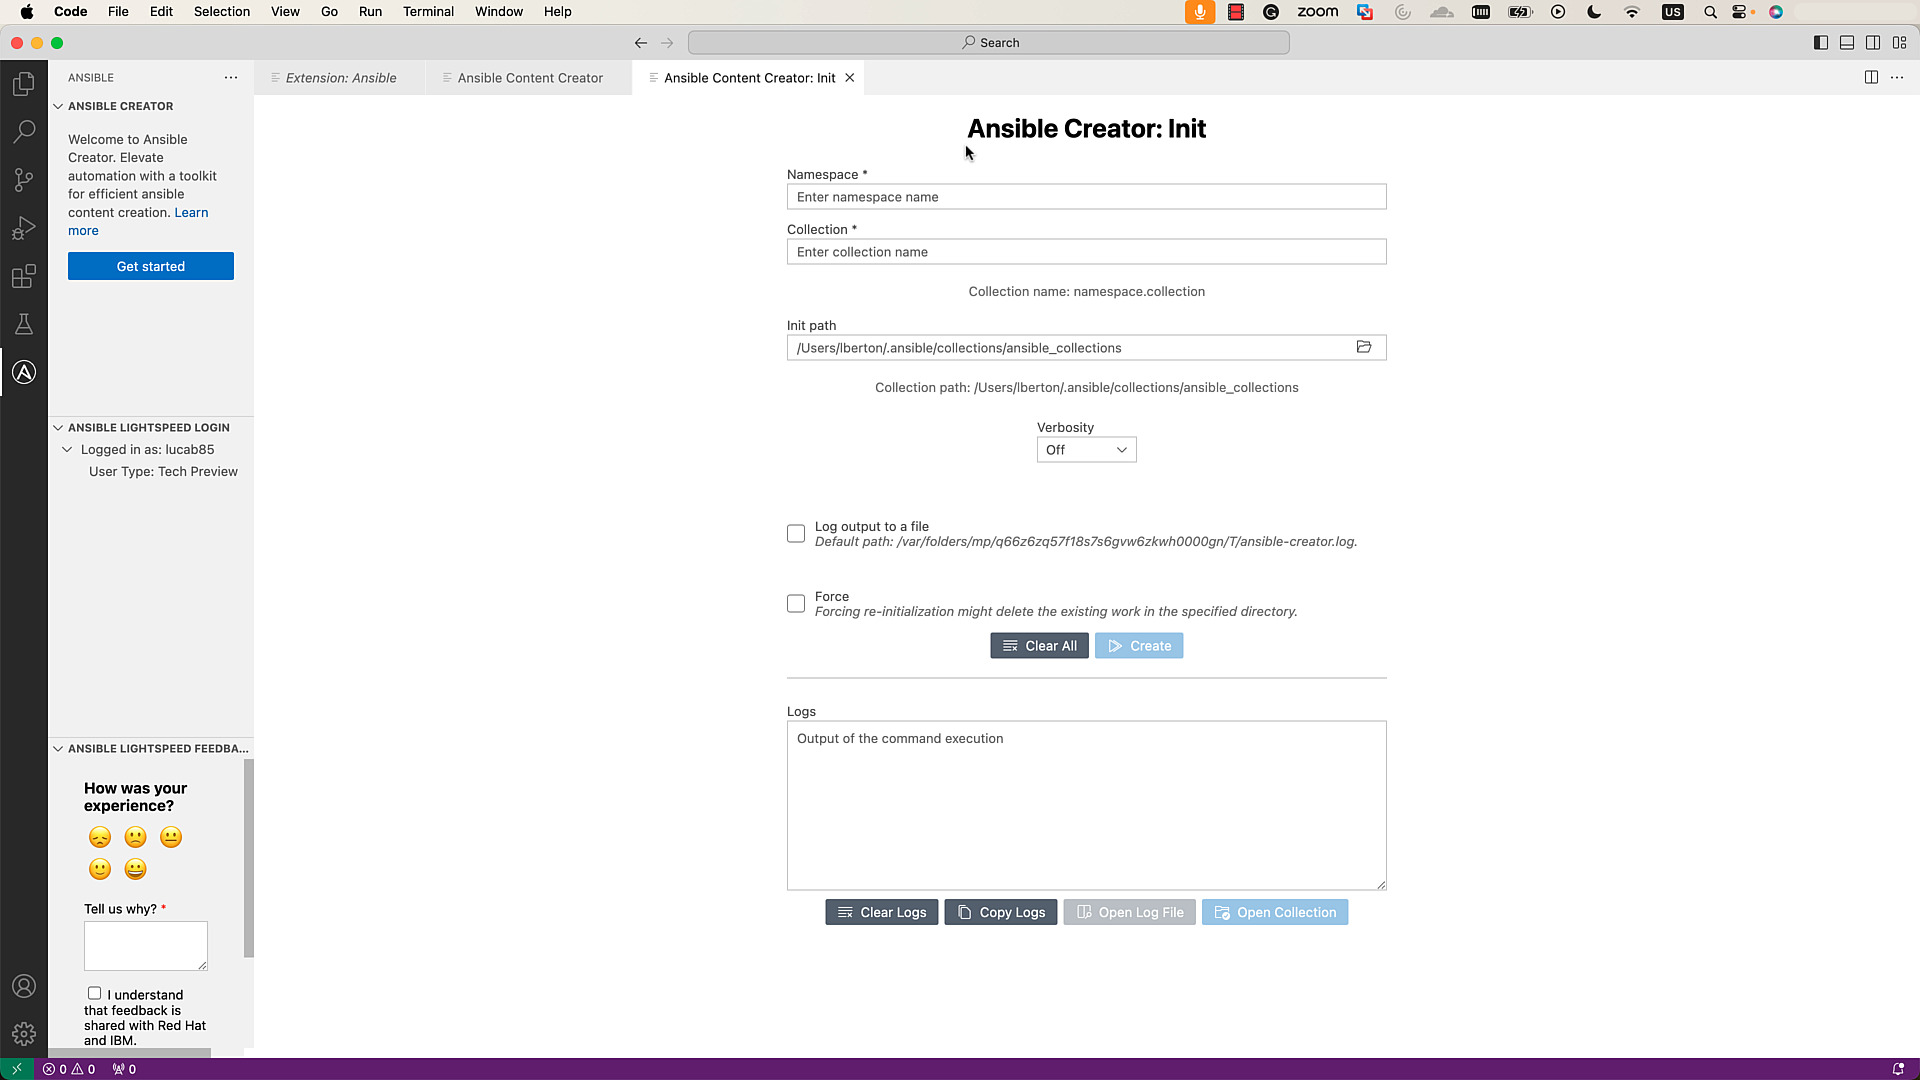
Step 2: Fill the Interactive Form
- Click "Initialize a collection"
- Enter the namespace (e.g.,
myorg) - Enter the collection name (e.g.,
myapp) - Select the initialization path using the folder icon
- Set verbosity level
- Optionally enable "Log output to a file"
- Check "Force" to re-scaffold an existing collection
- Click "Create"
Step 3: Open and Develop
- Click "Open Collection" to add it to your workspace
- The
galaxy.ymlfile opens automatically - Start developing your collection content
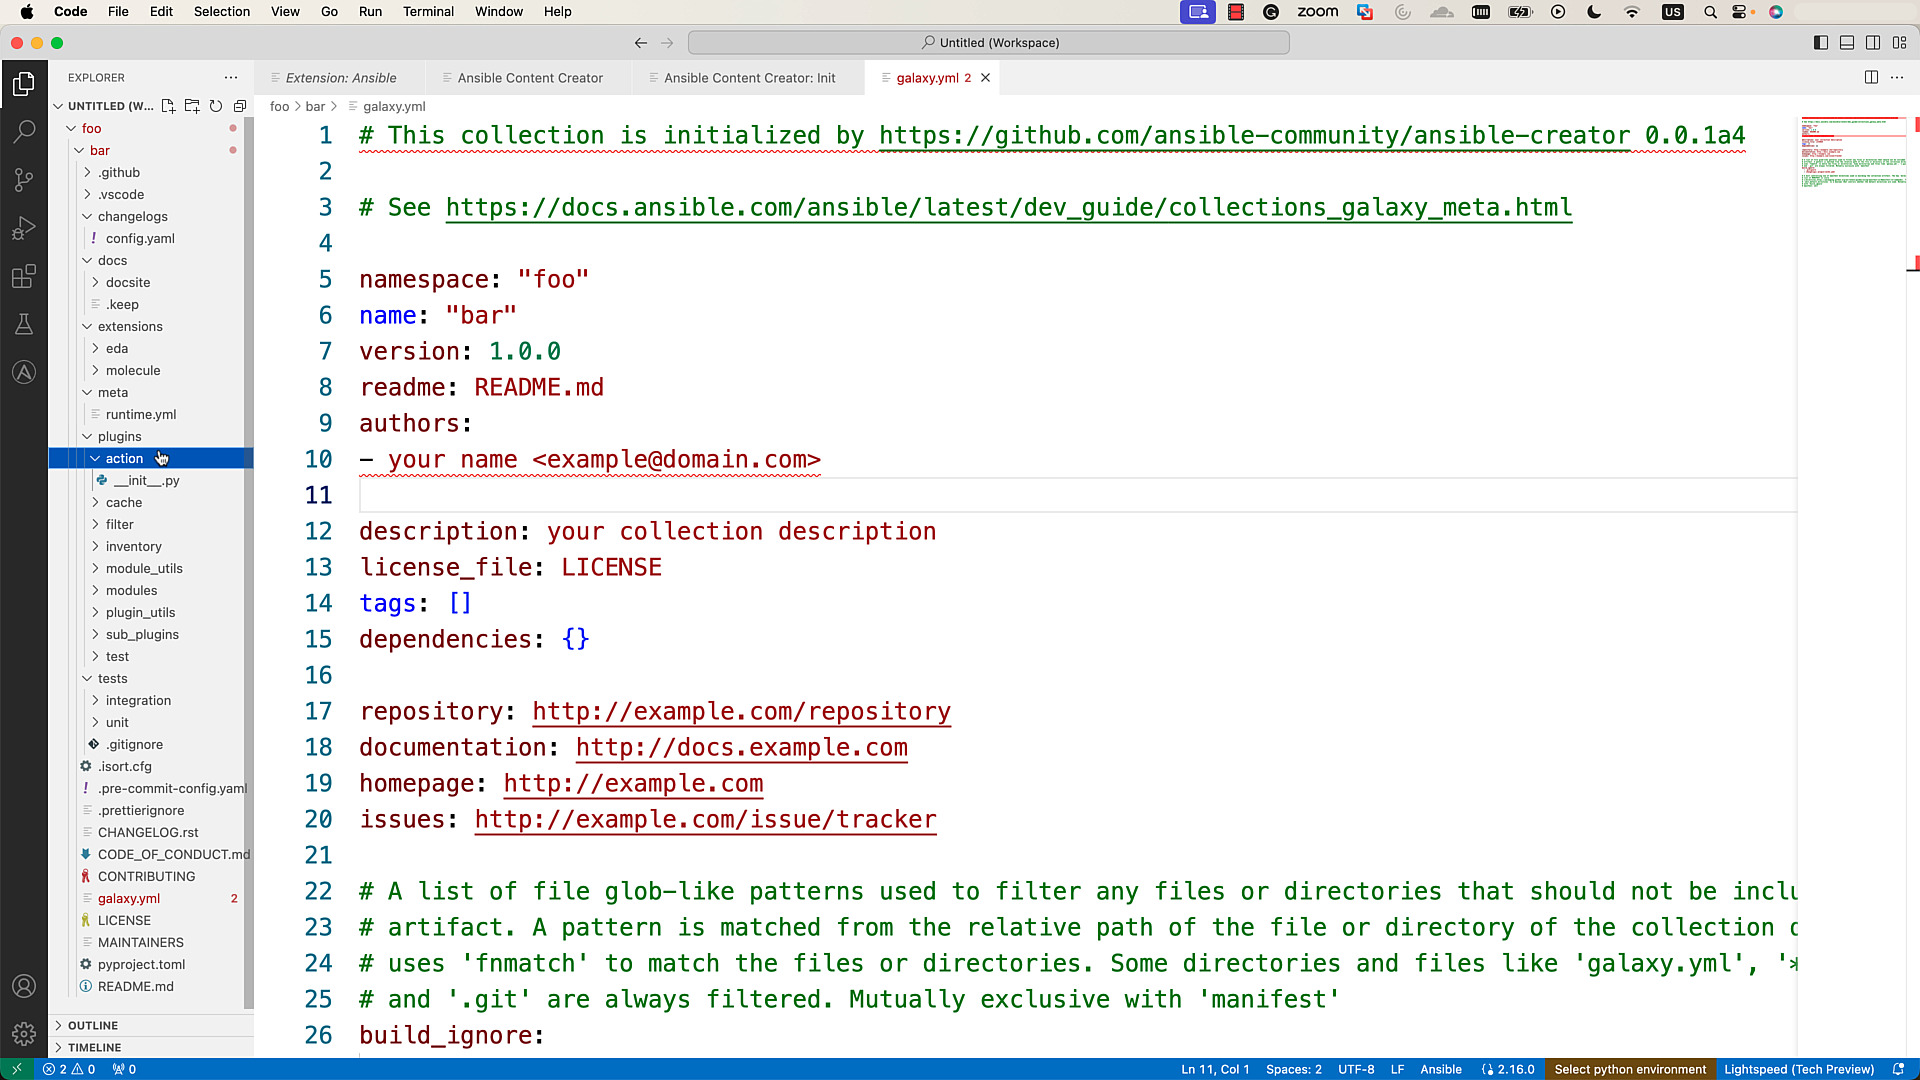
The VS Code extension provides syntax highlighting, auto-completion, linting, and go-to-definition for your collection code.
Understanding galaxy.yml
The galaxy.yml file is your collection's metadata:
namespace: myorg
name: myapp
version: 1.0.0
readme: README.md
authors:
  - Your Name <your.email@example.com>
description: A collection for managing myapp deployments
license:
  - GPL-3.0-or-later
license_file: ''
tags:
  - deployment
  - myapp
  - automation
dependencies:
  ansible.utils: ">=2.0.0"
repository: https://github.com/myorg/ansible-collection-myapp
documentation: https://docs.example.com/myorg/myapp
homepage: https://example.com/myapp
issues: https://github.com/myorg/ansible-collection-myapp/issues
build_ignore:
  - .gitignore
  - changelogs/.plugin-cache.yaml
Adding Content to Your Collection
Custom Module
Create plugins/modules/deploy.py:
#!/usr/bin/python
from ansible.module_utils.basic import AnsibleModule

DOCUMENTATION = r'''
---
module: deploy
short_description: Deploy application to target host
description:
  - Manages application deployment with version control
options:
  version:
    description: Application version to deploy
    type: str
    required: true
  path:
    description: Deployment target path
    type: str
    default: /opt/myapp
author:
  - Your Name (@yourname)
'''

EXAMPLES = r'''
- name: Deploy v2.1.0
  myorg.myapp.deploy:
    version: "2.1.0"
    path: /opt/myapp
'''

def main():
    module = AnsibleModule(
        argument_spec=dict(
            version=dict(type='str', required=True),
            path=dict(type='str', default='/opt/myapp'),
        ),
    )
    # Module logic here
    module.exit_json(changed=True, msg=f"Deployed version {module.params['version']}")

if __name__ == '__main__':
    main()
Custom Role
cd collections/myorg/myapp/roles
ansible-galaxy role init webserver
Custom Filter Plugin
Create plugins/filter/utils.py:
class FilterModule:
    def filters(self):
        return {
            'to_app_config': self.to_app_config,
        }

    def to_app_config(self, data, env='production'):
        return {
            'environment': env,
            'settings': data,
            'generated': True,
        }
Usage in playbooks:
- name: Generate config
  ansible.builtin.debug:
    msg: "{{ my_settings | myorg.myapp.to_app_config('staging') }}"
Testing Your Collection
Unit Tests
cd collections/myorg/myapp
python -m pytest tests/unit/ -v
Integration Tests
ansible-test integration --docker default
Sanity Tests
ansible-test sanity --docker default
Building and Publishing
Build the Collection
cd collections/myorg/myapp
ansible-galaxy collection build
This creates myorg-myapp-1.0.0.tar.gz.
Install Locally
ansible-galaxy collection install myorg-myapp-1.0.0.tar.gz
Publish to Ansible Galaxy
ansible-galaxy collection publish myorg-myapp-1.0.0.tar.gz --api-key YOUR_API_KEY
Publish to Private Automation Hub
ansible-galaxy collection publish myorg-myapp-1.0.0.tar.gz \
  --server https://hub.example.com/api/galaxy/content/published/ \
  --api-key YOUR_TOKEN
Using Collections in Playbooks
Install from Galaxy
ansible-galaxy collection install myorg.myapp
Requirements File
# requirements.yml
collections:
  - name: myorg.myapp
    version: ">=1.0.0"
  - name: ansible.windows
  - name: community.general
ansible-galaxy collection install -r requirements.yml
Use in Playbooks
- name: Deploy with custom collection
  hosts: web_servers
  collections:
    - myorg.myapp
  tasks:
    - name: Deploy application
      deploy:
        version: "2.1.0"
Or use the FQCN (recommended):
- name: Deploy application
  myorg.myapp.deploy:
    version: "2.1.0"
Related Articles
- Ansible Galaxy Guide
- VS Code for Ansible Development
- Ansible FQCN Guide
- Ansible Roles Guide
- Ansible Best Practices Guide
- Ansible Tutorial for Beginners
- How to Install Ansible
Conclusion
The ansible-creator tool eliminates the tedious manual setup of collection directory structures. Whether you prefer the CLI for scripted workflows or the VS Code GUI for interactive development, the result is a properly scaffolded collection ready for custom modules, roles, plugins, and testing. Once built, publish to Ansible Galaxy or a private Automation Hub to share your collection with your team or the community.