Visual Studio Code (VS Code) is the most popular editor for Ansible development, thanks to Red Hat's official Ansible extension that provides syntax highlighting, auto-completion, linting, and AI-powered code generation through Ansible Lightspeed.
Why VS Code for Ansible?
While you can write Ansible playbooks in any text editor, VS Code offers specific advantages:
- Ansible-aware syntax highlighting that distinguishes modules, parameters, and Jinja2 expressions
- Real-time ansible-lint integration that catches errors as you type
- Intelligent auto-completion for module names, parameters, and values
- Ansible Lightspeed AI that generates task code from natural language descriptions
- Integrated terminal for running playbooks without leaving the editor
- YAML schema validation specific to Ansible playbook structure
Prerequisites
Before setting up VS Code for Ansible:
- VS Code 1.70.1 or later (download from code.visualstudio.com)
- Python 3.9+ installed on your system
- Ansible installed (
pip install ansibleor system package) - ansible-lint recommended (
pip install ansible-lint)
Installing the Red Hat Ansible Extension
Step-by-Step Installation
- Open VS Code and click the Extensions icon in the sidebar (or press
Ctrl+Shift+X/Cmd+Shift+X) - Search for "Ansible" in the Extensions marketplace
- Find the extension published by Red Hat (verify the publisher name)
- Click Install

Post-Installation Verification
After installing, verify it works:
- Create a new file with
.ymlextension (e.g.,playbook.yml) - Click the language indicator in the bottom-right status bar
- Select "Ansible" from the language list (not "YAML")
- Start typing — you should see Ansible-specific syntax highlighting
The language indicator is critical: VS Code must recognize the file as "Ansible" (not plain "YAML") for all features to work.
Essential Configuration
Recommended VS Code Settings
Add these to your settings.json (Ctrl+, → Open Settings JSON):
{
  "ansible.python.interpreterPath": "/usr/bin/python3",
  "ansible.validation.enabled": true,
  "ansible.validation.lint.enabled": true,
  "ansible.completion.provideRedirectModules": true,
  "ansible.completion.provideModuleOptionAliases": true,
  "files.associations": {
    "**/playbooks/*.yml": "ansible",
    "**/roles/**/tasks/*.yml": "ansible",
    "**/roles/**/handlers/*.yml": "ansible",
    "**/inventory/**/*.yml": "ansible"
  },
  "editor.tabSize": 2,
  "editor.insertSpaces": true,
  "[ansible]": {
    "editor.autoIndent": "advanced",
    "editor.tabSize": 2
  }
}
File Associations
The files.associations setting automatically detects Ansible files based on path patterns. This prevents you from manually setting the language every time you open a playbook.
Common patterns to add:
| Pattern | Purpose |
|---|---|
**/playbooks/*.yml | Playbook files |
**/roles/**/tasks/*.yml | Role tasks |
**/roles/**/handlers/*.yml | Role handlers |
**/roles/**/defaults/*.yml | Role defaults |
**/group_vars/**/*.yml | Group variables |
**/host_vars/**/*.yml | Host variables |
Key Features
Syntax Highlighting
The Ansible extension provides context-aware highlighting:
- Module names in a distinct color (e.g.,
ansible.builtin.copy) - Parameters vs values differentiated visually
- Jinja2 expressions (
{{ variable }}) highlighted within YAML strings - Comments and tags clearly visible
Auto-Completion
Start typing and press Ctrl+Space to trigger suggestions:
- Module names: Type
ansible.builtin.to see all built-in modules - Module parameters: After a module name, get parameter suggestions with documentation
- Parameter values: For enum parameters like
state:, see valid values (present,absent, etc.) - Jinja2 filters: Inside
{{ }}, get filter suggestions likedefault,join,regex_search
Real-Time Linting
With ansible-lint installed, the extension checks your playbooks as you type:
- Syntax errors: Missing colons, incorrect indentation
- Best practice violations: Missing task names (
name:), use ofcommandinstead of specific modules - Deprecated features: Old module names, removed parameters
- FQCN warnings: Suggests using fully qualified collection names
Lint errors appear as squiggly underlines with hover-over explanations.
Ansible Lightspeed AI
Enable Lightspeed for AI-powered code generation:
- Open Settings → search "Ansible Lightspeed"
- Check "Enable Ansible Lightspeed"
- Sign in with your GitHub or Red Hat account
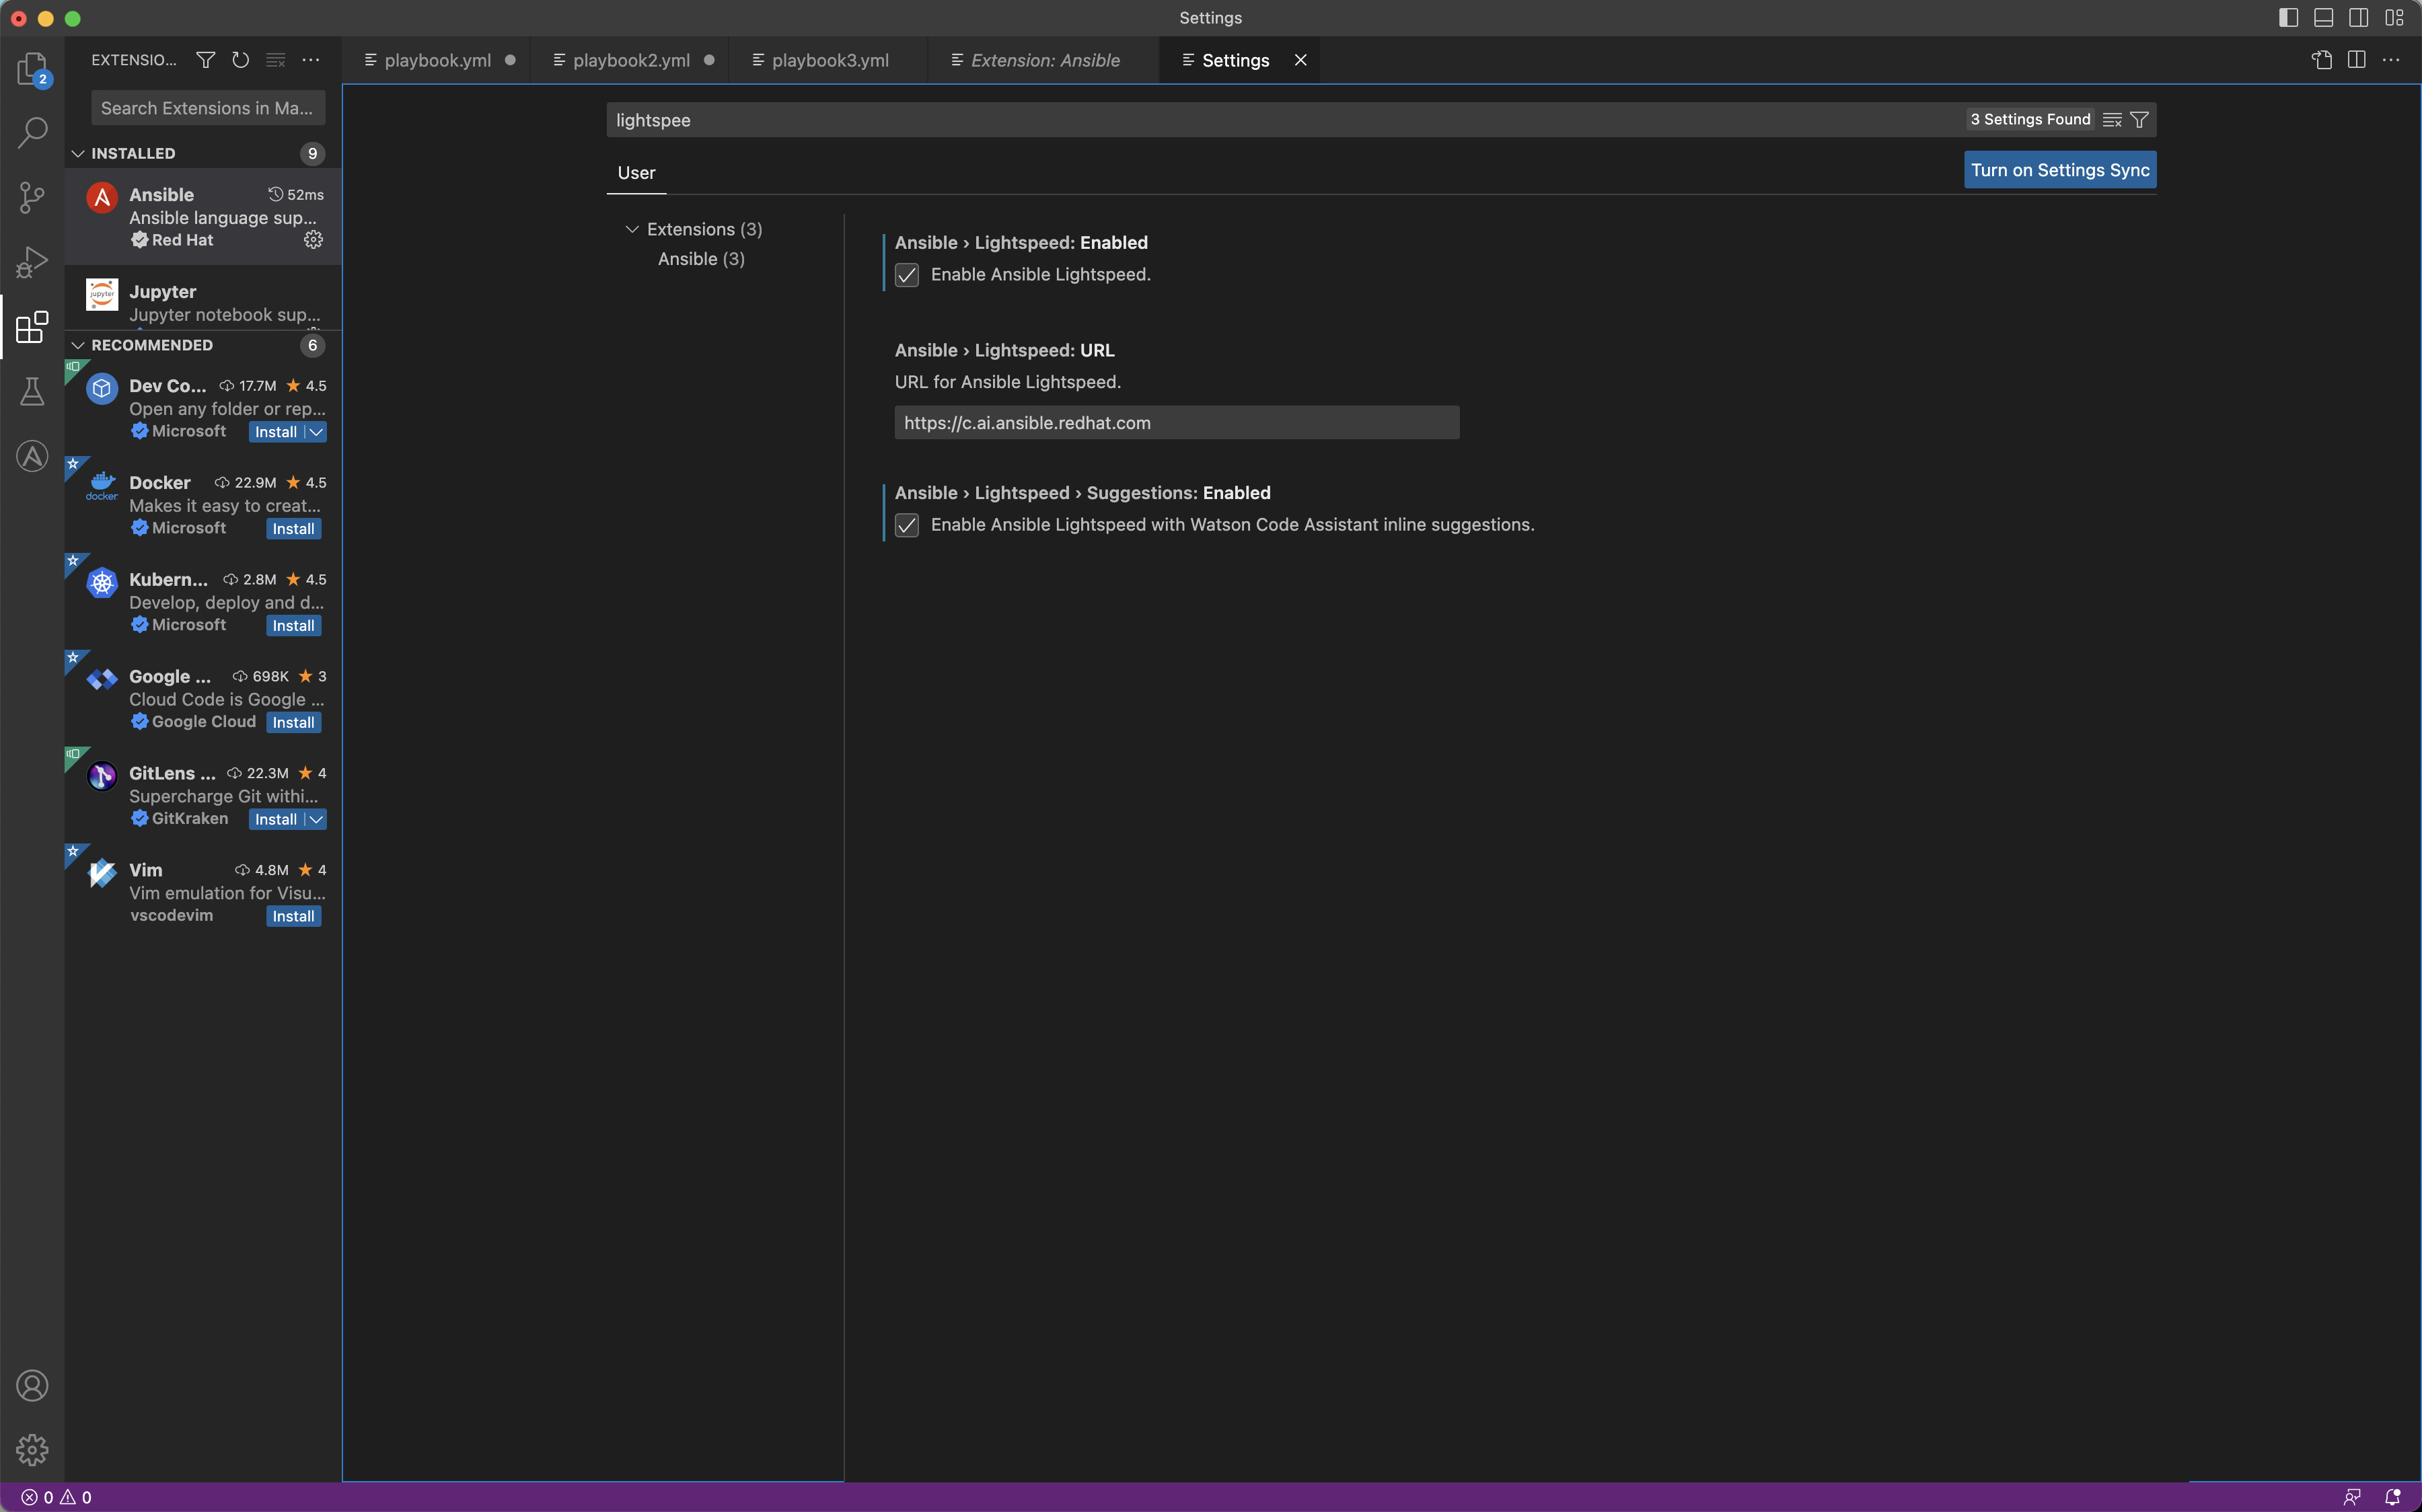
Once enabled, type a descriptive task name and Lightspeed generates the corresponding Ansible code as ghost text. Press Tab to accept.
For a deep dive, see our Ansible Lightspeed Complete Guide.
Keyboard Shortcuts for Ansible Development
| Shortcut | Action |
|---|---|
Ctrl+Space | Trigger auto-completion |
Ctrl+Shift+P → "Ansible" | Access Ansible commands |
| `Ctrl+`` | Open integrated terminal |
Ctrl+Shift+M | View Problems panel (lint errors) |
F2 | Rename symbol |
Ctrl+/ | Toggle comment |
Alt+Up/Down | Move line up/down |
Ctrl+D | Select next occurrence |
Ctrl+Shift+K | Delete line |
Tab | Accept Lightspeed suggestion |
Complementary Extensions
Enhance your Ansible workflow with these additional VS Code extensions:
| Extension | Purpose |
|---|---|
| YAML (Red Hat) | Advanced YAML support and schema validation |
| Remote - SSH | Edit playbooks on remote servers |
| GitLens | Git blame and history for playbook changes |
| indent-rainbow | Visualize YAML indentation levels |
| Better Jinja | Enhanced Jinja2 template highlighting |
| Docker | Manage Execution Environments |
Workspace Setup for Ansible Projects
A well-organized VS Code workspace improves productivity:
ansible-project/
├── .vscode/
│   ├── settings.json     # Project-specific VS Code settings
│   └── extensions.json   # Recommended extensions
├── ansible.cfg           # Ansible configuration
├── inventory/
│   ├── production/
│   └── staging/
├── playbooks/
├── roles/
├── group_vars/
├── host_vars/
└── collections/
    └── requirements.yml
Create .vscode/extensions.json to recommend extensions for your team:
{
  "recommendations": [
    "redhat.ansible",
    "redhat.vscode-yaml",
    "ms-python.python"
  ]
}
Troubleshooting
Extension Not Detecting Ansible Files
- Check the language indicator in the status bar — switch from "YAML" to "Ansible"
- Add file associations in
settings.jsonfor your project structure - Restart VS Code after installing the extension
Linting Not Working
- Verify
ansible-lintis installed:pip show ansible-lint - Check the Python interpreter path in extension settings
- Open the Output panel (
Ctrl+Shift+U) → select "Ansible" for error details
Auto-Completion Missing Modules
- Ensure Ansible is installed in the Python environment VS Code is using
- Install collections locally:
ansible-galaxy collection install community.general - Restart the Ansible language server:
Ctrl+Shift+P→ "Ansible: Restart Ansible Server"
Slow Performance on Large Projects
- Exclude directories in settings:
"files.watcherExclude": { "**/collections/**": true } - Disable telemetry for faster startup
- Use workspace trust to limit scanning
Links
Related Articles
- Ansible Lightspeed Complete Guide: AI-Powered Automation
- Ansible Lightspeed Beta Review
- How to Install Ansible Step-by-Step
- Ansible Best Practices for Production Environments
- Ansible Lint: Best Practices and Automation
- Ansible Error Handling: blocks rescue always
- Understanding Ansible Roles
Conclusion
VS Code with the Red Hat Ansible extension is the definitive development environment for Ansible automation. The combination of intelligent syntax highlighting, real-time linting, auto-completion, and Ansible Lightspeed AI creates a workflow where you spend less time looking up documentation and more time writing working automation.
Start with the basic extension installation, configure file associations for your project structure, and gradually enable advanced features like Lightspeed AI as you grow comfortable. The productivity gains compound — especially for teams standardizing on a common development environment.